

We are all about helping you get your original and world-changing content out on the web. Today, we are talking all things Pinterest for Business for promotion of your awesome blogs and website content!
If you’ve been following along with our Content Marketing series (via our weekly webinar), you know we have been covering topics on content marketing basics. This includes topics such as
- How to do keyword research for free
- How to write a wonderful blog post
- How to launch your own podcast
- And how to grow your email list
We actually have freebies for most those things to help you get started FAST! So if you haven’t grabbed them… what are you waiting for???
Fun Fact: You can get a free trial of our favorite Pinterest scheduling tool just by clicking this link > Get the Awesome Tool!
Watch the Pinterest for Business Replay!
\
Step #1: Create or Switch to a Business Account (0:00 to 3:04)
Now that you’ve launched yourself into the blogosphere, what do you do with your content? Here are our secrets for you on how you can actually use Pinterest for Business. We are going to think about Pinterest in terms of business today because that is how to handle social media even if you are a personal brand or musician. If you want to make money online and you want to actually get your content out into the world, think of yourself as a business and it’s going to go way better for you.
You always want to use Pinterest as a business account because it gives you access to so much more in terms of analytics, data, information, and things that are going to help you get your content seen.
If you don’t have a Pinterest for Business account already, visit this link > Get a Pinterest Business Account!
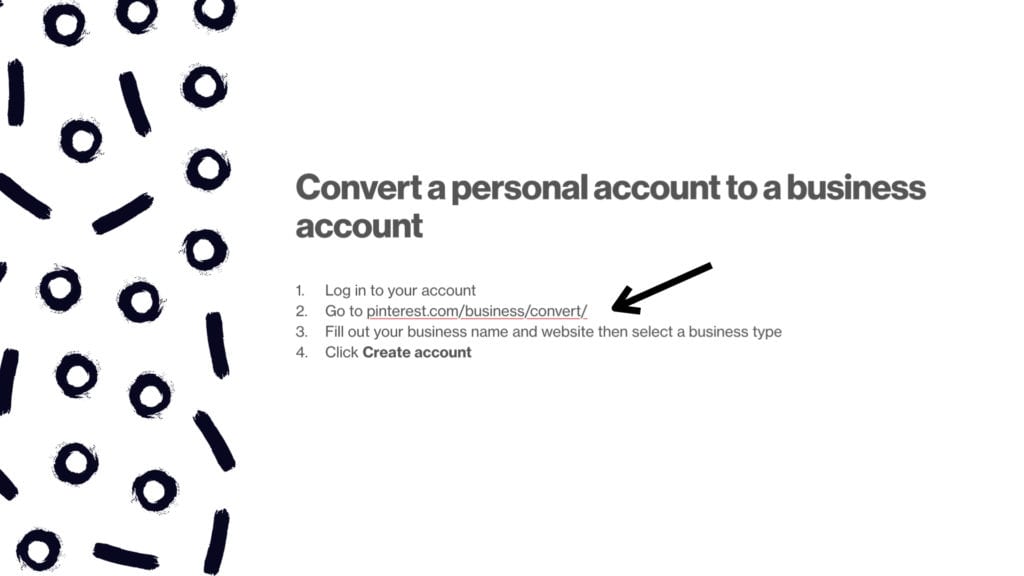
If you have a personal account you want to convert to a Business Pinterest account, you can convert your personal account. Below are the exact steps for how to convert your Pinterest account to a business account.
It is extremely easy to do, and later on in this post, I’m going to show you how to even make sure it’s linked to your WordPress website properly.
#2 Optimize Your Pinterest Profile (3:05 to
For this example, I used one of my brand new blogs that did not even have a Pinterest account until yesterday because it launched just a couple of weeks ago.
I only have like five or six blogs (NOTE: you don’t have to have like 25 blogs to launch) Below are some of the essential places that you need to add keywords to your Pinterest for Business profile.
Make sure you add keywords to:
- Your profile name
- Your profile URL
- Your description
- On your featured board
So where are all of those places? I’m glad you asked. Below are the screenshots of where those spots are. If you want to watch that in the tutorial, just click here!
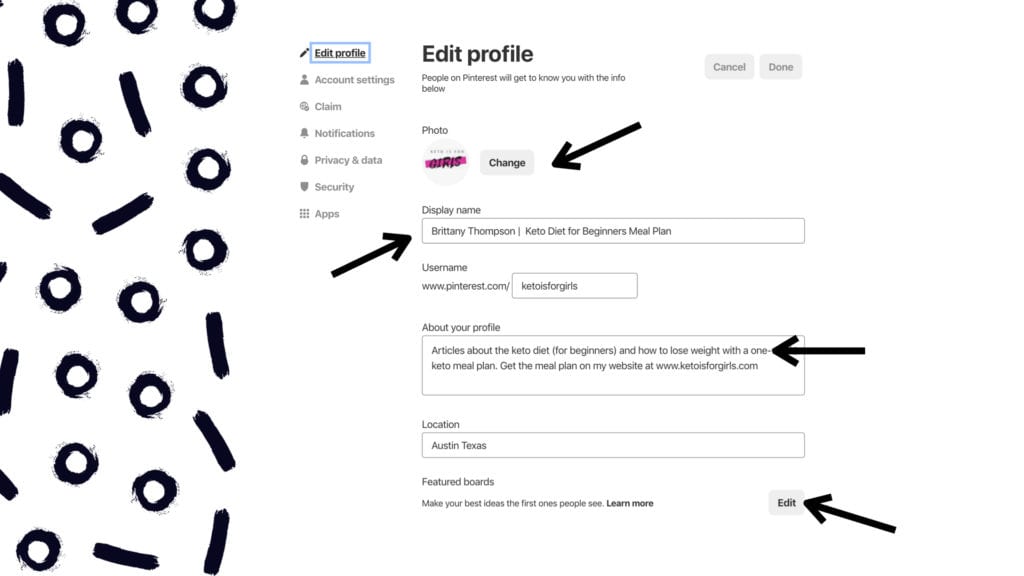
Lastly, you want to change your profile image and make sure it’s your logo or that it’s a really good headshot of you personally. Tip: People connect with people.
So you might be thinking, “I need a little bit of help with this step. How do I know what keywords to use??” We got you. This is where you’re going to use the keyword research blog we posted a few weeks back. ????#solved
This is your first step on everything on your website, blogging content, pages, and your landing pages should be keyword optimized and on your Pinterest profile. Pinterest operates as a visual search engine, not a social network. If you think of Pinterest in terms of a search engine (like Google), it changes your perception of how you put your content on Pinterest.
Step #3 Claim Your Website
Now we’ve got our profile all set up we’re going to go ahead and claim our website. This is again, one of those business features that you only get access to when you have a Pinterest for business profile.
Okay, so how do you even go about claiming your website? Well, back in that profile settings page that we were just on in step 2, we are going to click the button labeled “claim”.
Now, once you click on that button, you’re gonna see this little pop-up.
Select add HTML tag. NO FREAKING OUT… It’s super easy, okay? ????

Now, you’re going to copy the information in the window
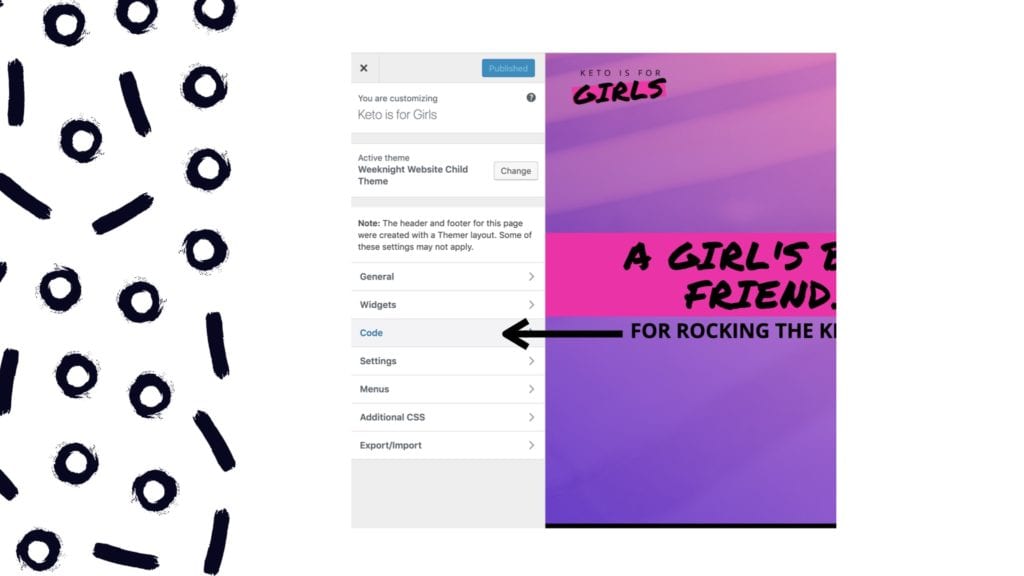
Open your WordPress website in a new window
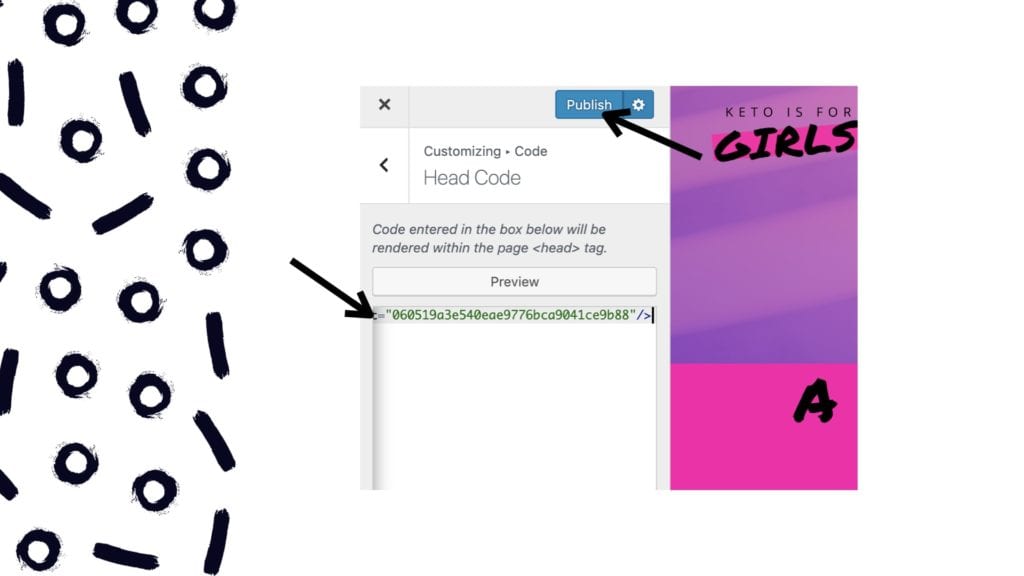
Navigate to “appearance” on the left-hand side and click on “customize”.

Once you click customize, it’s going to open a completely new window. This window is the settings for your theme.
Once that window opens, click on “code”.
Then select Head Code (Do not confuse with “Header Code”)
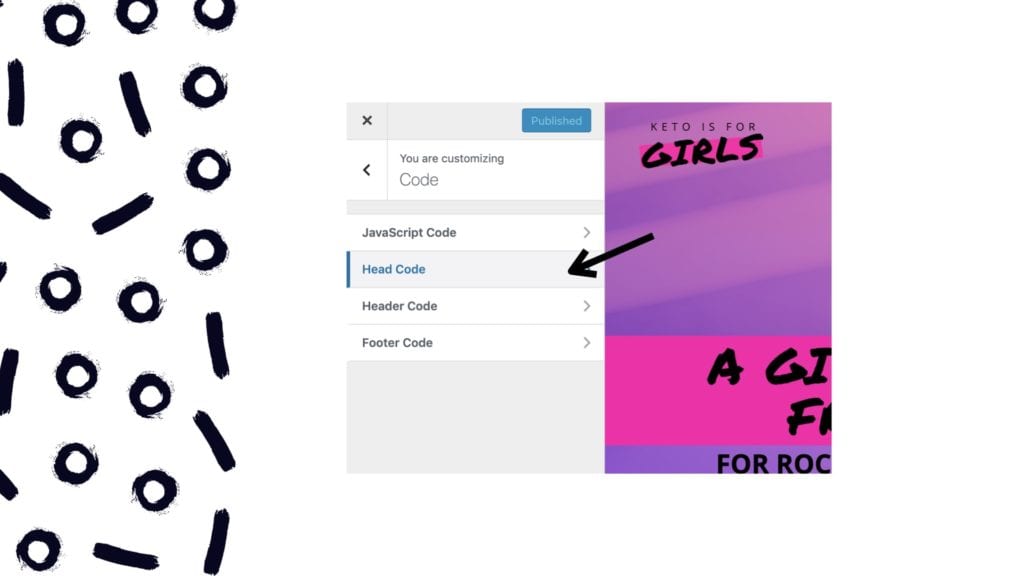
Paste in the code from Your Pinterest business account that we copied earlier and then click “publish”
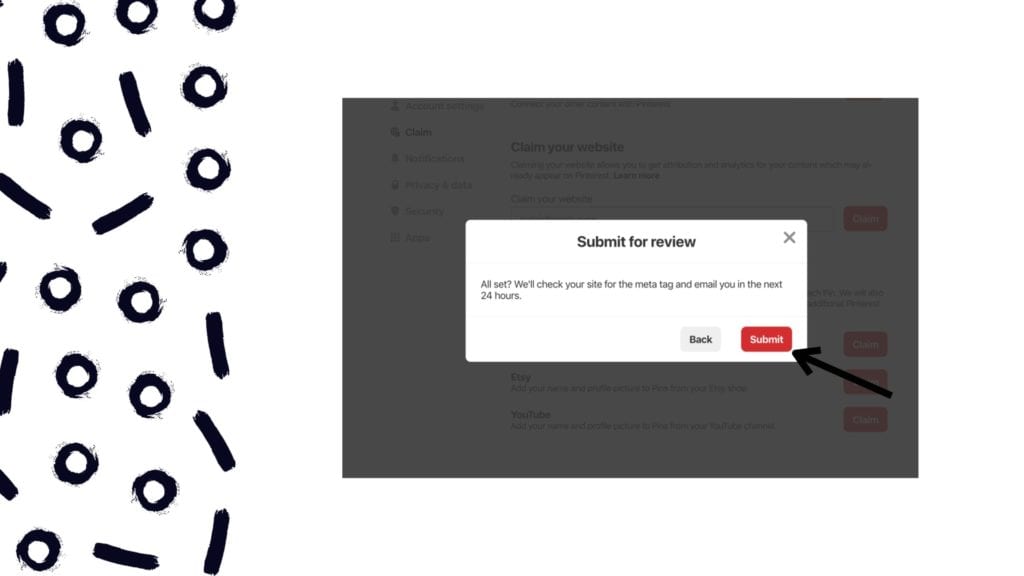
Navigate back to Pinterest and select the submit button to tell Pinterest to go check for your website information. If you followed the steps correctly, you will see your website verified in less than 24 hours!
Now your, your website is verified and it’s going to show up on your profile. This means nobody will be able to take your website and claim your content as their own.
Step #4 Add Pins to your Account
I already hear you asking “How do I put my content on my Pinterest account from my website?” and “How do I get my blogs from my website posted to Pinterest? it’s really simple!
navigate to your Pinterest account and then click the button in the upper right-hand corner labeled “add pin”. I know. So easy, right?

Now, there are a few steps here that I want you guys to be aware of.
The first thing you’re going to do is on this left-hand side of the pop-up window, is add your image.
Now Add a title, description and the URL of your blog post… Again, we want keywords. Below is an example of this all filled in properly for you!
When writing your Pinterest description include answers to these questions if you can:
- Why should somebody click on this article?
- What’s important about your topic?
- Why do you have better information than the next guy?
Note: Pinterest has started implementing some hashtag search features, but it is not as popular on this network as it is on Instagram or Facebook. Moral of the story, use them sparingly.
Now all you need to do is click publish!

#5 Schedule Pinterest for Business Pins
Right now, I personally schedule my pins in advance. All right, now a lot of people are going to ask and I can hear it now, “How do you even do that?” and “How many do you schedule?” and “When do you schedule them for?”
Well, this is where my favorite tool called Tailwind comes in. It’s amazing. You can schedule as much content as you want and it’s so easy it takes less than 5 minutes to schedule for a month. Right now I have about 620 pins in my queue. ????
How to Use Pinterest for Business Key Takeaway!

It is content, content, and more content. That is what makes the Internet world spin, okay? So, if you want to master Pinterest for Business, churn out that content. Just make sure it’s high quality, okay? Don’t just put it out for the sake of putting it out. Put out high quality, really valuable content. People are going to love you for it.